back
How to Test the Starter
Motor On the Car (Step by Step)
Link to this original website
- Test the battery first. This is a simple multimeter test.
- Test that the starter motor is receiving 12 Volts on its Battery Circuit.
- Test that the starter motor is receiving the Start signal from the ignition switch.
- Voltage Drop Test the starter battery and ground Circuits. These two tests are very easy. I'll explain them step by step.
- Using a Jumper-Wire or an appropriate tool, apply 12 volts to the Start signal wire.
- Turning the engine by hand to eliminate a locked-up engine or a locked-up A/C Compressor.
- If necessary, bench-testing the starter motor.
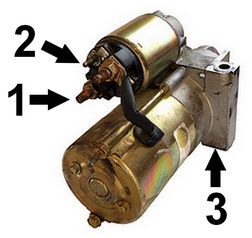
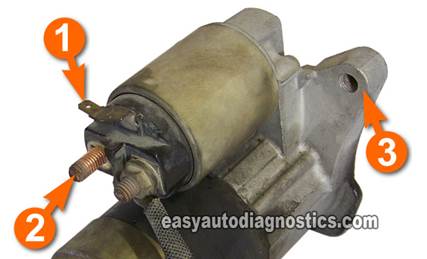
Starter Motor Circuit Descriptions
number 1: This is where the battery positive cable from the battery is attached to.
number 2: This is the S terminal of the starter Solenoid. This is where the Start/Crank wire is attached to and the one that delivers the 12 Volts
from the ignition switch when you turn the key to Start.
Some vehicles will use a nut to attach this circuit to the starter Solenoid. Other vehicles (mainly Japanese cars & trucks) will have a female spade
terminal instead that mates to a male spade terminal.
number 3: The grounding point. The starter motor is grounded thru' its case.
Start With the Battery First
The battery's condition is the most important part of the starter Tests and the first thing that has to be checked.
There are two parts to this test. Visually checking that the battery terminals for obvious problems and Testing the battery's voltage with a multimeter.
- Eye-balling the battery:
- The battery terminals should not be full of corrosion (like in the photo).
- The battery terminals should not be loose or broken.
- If these conditions are present, then clean or replace the battery terminals.
- Battery voltage test:
- With a digital multimeter or an analog multimeter test the battery's voltage.
- A good working battery will show 12.6 Volts. The bare minimum will be 12.3 Volts.
- Any battery voltage below 12.3 Volts, and you'll need to charge the battery first, or use a battery jump Box during the tests, or replace
it with a known-good battery.
- Having a good working battery is important to test the starter on the vehicle.
After cleaning, or repairing the battery terminals, or replacing a BAD battery, or charging a discharged battery the car or truck may start. If this is the
case, well good for you. Further testing is not required.
TEST 1: Testing the
Start signal from the ignition switch
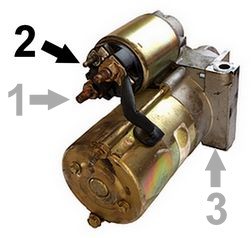
As mentioned before, the circuit labeled by the number 2 in the photo is commonly known as the S terminal of the starter Solenoid. Attached to this
S Terminal is the wire that comes from the ignition switch via the Neutral Safety Switch. This is a 12 Volt Signal.
When the key is turned to crank the engine, juice flows from the ignition switch, thru' the Neutral Safety Switch and onto the S terminal of the
starter Solenoid.
On a good and working starter motor, as soon as this 12 Volt Signal is received, the starter motor comes alive and cranks the engine.
This test verifies the presence of these 12 Volts and indirectly tests the Ignition Switch and the Neutral Safety Switch. You'll only get one of two
results from this test: you'll either get 12 Volts or not. Let's get started:
- Step 1:
- Raise and support the vehicle on jack stands (if applicable).
- The starter motor must remain connected to all of its cables/wires.
- Step 2:
- Attach the BLACK multimeter lead (with an appropriate tool) to the Negative Terminal of the battery.
- With a wire-piercing probe or a suitable tool, pierce the wire that is attached to the S terminal of the starter Solenoid
- Or if you have enough room, touch the S terminal with the multimeter lead.
- Step 3:
- Put the multimeter in Volts DC mode.
- Have an assistant turn the key to the Start Position and have him or her hold it there while you observe the multimeter's voltage reading.
If when your assistant turned the key to the Start position to crank the engine (and kept it there), and if the multimeter:
- DID NOT register any voltage, then the starter motor is not the cause of the Does Not Crank condition. Without these 12 Volts here
(when the key is turned to the Start position) the starter motor will not come out to play. Possible causes for this missing voltage are:
- DID register 10 to 12 Volts, then the Start Signal is being received. The presence of this voltage confirms that:
TEST 2: Adding 12 Volts to the S Terminal Circuit

You've reached this Test because you have verified that there aren't 12 Volts (10V - 12V) present at the S Terminal of the Solenoid when
the key is turned to the Start position in TEST 1.
Now we're gonna' apply the 12 Volts ourselves (with a jumper wire or a tool like a Power Probe) to verify that the starter motor works.
We're gonna' get only one result from this test. And it's that the starter motor should engage the engine and crank it.
- Step 1:
- With the vehicle still raised and supported on jack stands.
- And the starter motor connected to all of its cables/wires.
- Step 2:
- The Key (Ignition Switch) must be in the Off position (or the car or truck may start).
- Step 3:
- Apply 12 Volts (with a jumper wire or a suitable tool or tools) to the starter Solenoid's S Terminal or to the wire itself.
The starter motor should engage the engine and crank it. If it does, then now you can be absolutely certain that the starter motor is good and
not the cause of the Does Not Crank Condition. The most likely causes will be a BAD Ignition Switch or a BAD Neutral Safety Switch.
TEST 3: Voltage Drop Testing the Power Circuit
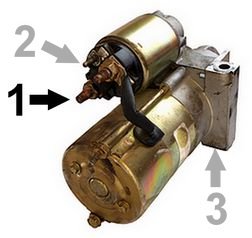
In this TEST 3 we're gonna' Voltage Drop Test the Power Circuit of the starter solenoid. This circuit is represented by the number 1 in the
photo. This is where the positive battery cable is attached to.
The Voltage Drop test will tell us if the starter motor is receiving the full amount of voltage and amperage to turn over the engine. If corrosion
or anything else is causing high resistance and impeding this flow of juice, this test will tell us.
This test can only be performed with you helper turning the key to the Start position and keeping it there for the duration of the test.
- Step 1:
- With the vehicle still raised and supported on jack stands (if applicable).
- And the starter motor connected to all of its cables/wires.
- Step 2:
- With the multimeter set on Volts DC...
- Attach one lead (either one, the polarity doesn't matter) to a clean spot on or near the center of the battery positive post
(not the terminal... this is important!).
- Attach or touch the other lead to the center of the stud to which the battery positive cable is attached to on the starter solenoid.
It's important that the center of the stud be probed and not the cable's terminal itself.
- This is the stud labeled by the number 1 on the photo.
- Step 3:
- Have your assistant turn the key to the Start position while you observe the multimeter.
The multimeter will either indicate a zero Voltage Drop or a sizeable Voltage Drop. If the multimeter:
- Registered .9 Volts or less, then we can consider this a zero Voltage Drop and this is a good thing. this voltage value tells us that the
battery positive cable is delivering the complete amount of Voltage and Current to the starter motor.
- Registered 1 to 7 Volts, then this is considered a High Voltage Drop and this is BAD. this voltage value tells us that the battery
positive cable is NOT delivering the complete amount of Voltage and Current to the starter motor:
- This will cause a No Crank condition.
- Or cause the starter motor to crank the engine very slowly.
- The most likely cause is a corroded battery positive terminal and or battery positive post.
- Or the round terminal that attaches the battery positive cable to the battery terminal of the starter Solenoid is corroded.
- Inspect and clean and retest. More than likely the vehicle will now start.
OK, what's a Voltage Drop? and in plain English please!, a Voltage Drop is when the multimeter helps the juice flow from the battery positive
terminal to the starter solenoids battery cable terminal because a high resistance is blocking this flow thru' the cable itself.
High Voltage Drop
When there's a sizeable Voltage Drop, the multimeter will register voltage. this voltage could be anywhere in the range of 1 Volt to 7 Volts.
And this is BAD because this is a clear indication that the Voltage from the battery positive post is finding a path of least resistance thru' the
multimeter to get to the starter.
In other words, the voltage and thus current, is unable to completely flow thru' the battery cable to the starter motor. Whatever amount that
can't flow thru' the cable, flows thru' the multimeter. This is what's called a Voltage Drop.
The most common cause of a high Voltage Drop reading is corrosion on the battery positive cable terminal or the battery positive post.
Inspect and clean and retest.
If you do indeed have a high Voltage Drop, inspecting and cleaning the battery terminal and post will probably result in the starter motor
working and the vehicle starting.
No Voltage Drop
So then, if the multimeter registers .9 Volts or less, we can correctly assume that the battery cable or its Terminals don't have corrosion or
other resistance issues and are letting the full amount of voltage and more importantly current thru' to the starter motor.
This very very low Voltage Drop reading tells us that the voltage is finding a path of least resistance thru' the battery cable than thru' the multimeter.
With this result (if this is the result you got from this test) we now can move on the next test.
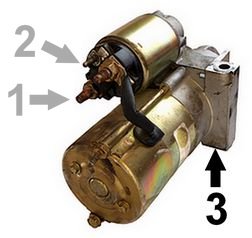
TEST 4: Voltage Drop Testing the Ground Circuit
You've reached this test because you have verified that there are 12 Volts (10 - 12) present at the S Terminal of the solenoid when the
key is turned to the Start position and that there is no Voltage Drop on the Battery Circuit of the starter motor solenoid.
Here we're gonna' see if the starter motor is getting a complete and unobstructed path to ground.
Or if corrosion or anything else is causing high resistance and impeding this flow of juice to engine ground.
- Step 1:
- With the vehicle still raised and supported on jack stands.
- And the starter motor connected to all of its cables/wires.
- Step 2:
- With the multimeter set on Volts DC...
- Attach one lead (either one, the polarity doesn't matter) to the center of the Negative (-) Post of the battery (not on the terminal itself).
- Attach or touch the other lead to an unpainted spot on the starter motor body.
- A suggested spot is labeled by the number 3 on the photo.
- Step 3:
- Have your assistant turn the key to the Start position and have him or her keep it there (for the entire test) while you observe the multimeter.
The multimeter will either indicate a zero Voltage Drop or a sizeable Voltage Drop. If the multimeter:
- Registered .9 Volts or less, this is GOOD and a clear indication that the starter motor's ground does not have any issues.
- Registered 1 to 7 Volts, This is BAD. This indicates that the starter motor's ground has corrosion issues or the like:
- This will cause a No Crank condition.
- Or cause the starter motor to crank the engine very slowly.
- The most likely cause is a corroded battery negative terminal and or battery negative post.
- Or the round terminal that attaches the battery negative cable to the engine block is corroded.
- Inspect and clean and retest. More than likely the vehicle will now start.
TEST 5: Turning the Engine by Hand
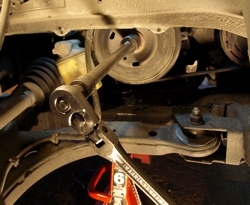
Another common cause of a Does Not Crank Condition is a locked-up engine due to a thrown rod or a locked-up AC Compressor. These
two conditions can easily lead us to believe that the starter motor is BAD.
To find out if the engine is locked-up or not, we need to manually turn the engine by hand using a socket and ratchet (as shown in the photo)
- Step 1:
- With the vehicle still raised and supported on jack stands.
- And the starter motor connected to all of its cables/wires.
- Key in the Off position or completely removed from the ignition switch.
- Step 2:
- Using the appropriate tools, turn the crankshaft pulley by hand.
If Crankshaft Pulley turns. Then the engine is not locked-up and we now can eliminate the engine as the cause of this Does Not Crank
Condition. It's starting to look like the starter motor is BAD. Go to the TEST 6: Bench-Testing the Starter Motor.
If Crankshaft Pulley DOES NOT turn. There's a good possibility that the engine is indeed locked-up but we need to perform one more
test to make sure. This is to verify that the AC Compressor is not seized.
Verifying that the AC Compressor Is Not Seized
Since the Crankshaft Pulley drives the AC Compressor, a seized AC Compressor will keep the Crankshaft from turning. So then, the next
step (after ascertaining that the engine can't be hand cranked) is to remove the drive belt or serpentine belt that turns the AC Compressor.
- Step 1:
- With the vehicle still raised and supported on jack stands.
- And the starter motor connected to all of its cables/wires.
- Key in the Off position or completely removed from the ignition switch.
- Step 2:
- Remove the AC Compressor Drive Belt or the Serpentine Belt.
- Using the appropriate tools, turn the crankshaft pulley by hand again.
If Crankshaft Pulley turns. Then the AC Compressor is seized and is the cause of this Does Not Crank Condition. The starter motor is not
the cause of the Does Not Crank Condition.
If Crankshaft Pulley DOES NOT turn. The engine is locked-up. The starter motor is not the cause of the Does Not Crank Condition.
Guidelines For Bench-Testing Starter
I have seen so many folks have trouble with this very simple test. By following these simple guidelines you'll be able to correctly diagnose a BAD starter.
- You'll need some battery jumper cables.
- A jumper wire.
- The most important thing will be that you'll need a working battery.
- It can NOT be a new battery.
- This battery should come from a working vehicle if possible.
- You CAN NOT use a jump box instead of an actual battery.
- You need to place the starter in a vise if you have one.
- If no vice is available, you'll need to have a helper hold it while you do the test.
- All safety precautions must be taken to not get fingers or anything else caught in the spinning pinion gear.
Following these simple guidelines will save you a headache and or having to replace a good starter.
STEP 1:The Circuit Descriptions
The photo of the starter motor used in this article is of a 2000 Mazda Protegé. The starter motor on your vehicle will look similar.
So, whether your car or truck is a Ford, a Chevrolet, a Nissan, a Mazda, a Dodge, a Chrysler, a Toyota or whatever... This starter bench test applies.
To bench test the starter you'll need battery jumper cables, a jumper wire, a working battery, and of course the starter motor out of the car or
truck. These are the circuit descriptions of the photo above:
- number 1: This is where the Start/Crank wire is attached to. When you turn the ignition switch to Start/Crank this wire delivers 12 Volts
to activate the starter solenoid. This in turn makes the starter motor work.
- number 2: This is where the cable from the battery is attached to.
- number 3: The Grounding point. The starter motor is grounded thru' its case.
back